# wallpaper_slideshow Basics & Functions of Graphical Tools
Keywords: Graphical Tools, General Tool Functions, Background Selection, Adding Geometric Figures, Adding Text Cards, Cursor Mode, Laser Pointer, Drawing, Pen Thickness, Pen Color, Foreground, BackgroundGraphical tools, such as the Whiteboard, are at the heart of visual collaboration. While each tool is designed for specialized tasks, they all follow a consistent operating logic.
Expand Table of Contents
# Anatomy of a Graphical Tool
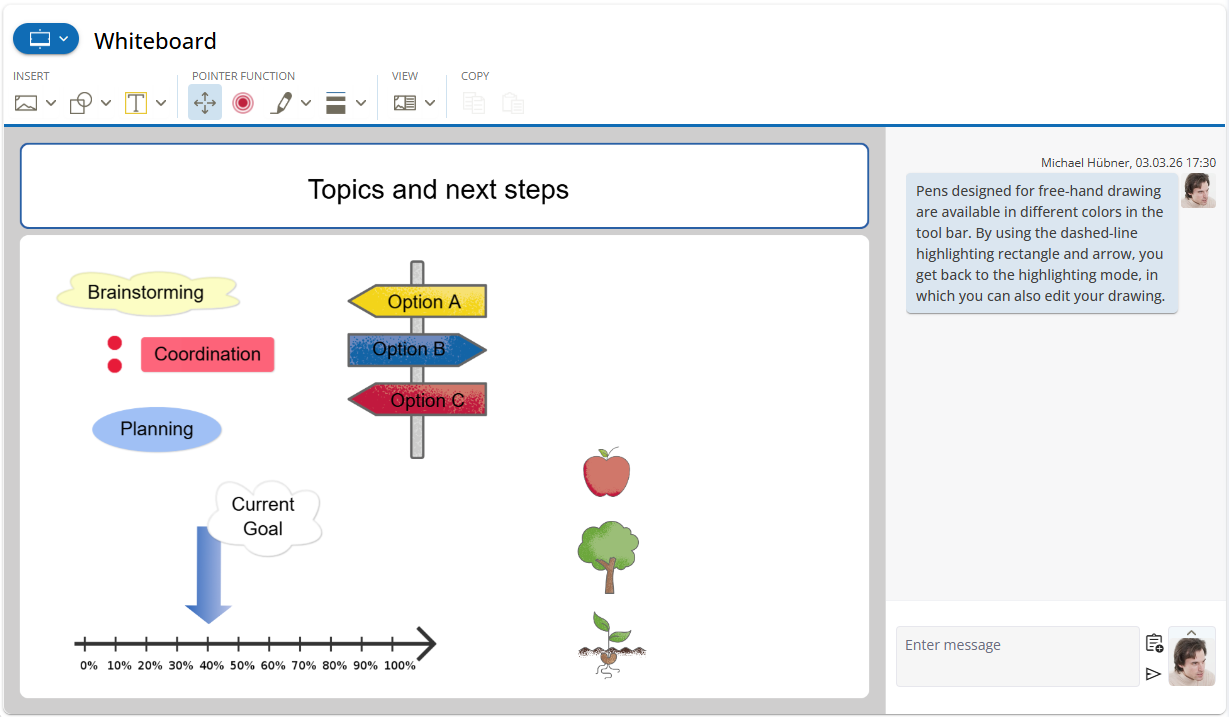
Every graphical tool is divided into three logical areas to ensure intuitive operation:
- The Toolbar (top): Access all functions for creating, editing, and managing elements.
- The Main Workspace (center): Your interactive canvas. This is where text cards, symbols, and diagrams are placed and moved freely.
- The Integrated Chat (right): Each tool features its own chat channel for context-based coordination and documentation.
# construction The Toolbar in Detail
The toolbar provides quick access to core functions. Many buttons include a dropdown menu (small arrow) for advanced options.

# 1. "Insert" Section
image Background: Select a suitable background image from the library.
Advanced Functions (keyboard_arrow_down Dropdown):- add_photo_alternate Custom Background Image: Select your own images or upload new ones.
Image Management
You can store custom images in designated folders: Managing Documents. During upload, you can crop the image to ensure it fits the tool frame perfectly.
fit_page_height Canvas Size: Expand the workspace to double or triple its original height.
Running out of space?
Many tools can be extended downwards. Use this for extensive brainstorming, but keep in mind that participants will need to scroll to see all content.
shapes Symbol: Add icons or geometric shapes to your visualization.
Advanced Functions (keyboard_arrow_down Dropdown):- category Own Symbol
Custom Symbols (Dropdown)
You can upload and select your own graphic files. PNG files with transparency are ideal, as they integrate seamlessly and can be moved freely on the canvas just like the built-in symbols.
Upload details: Managing Documentssticky_note Text Field: Places a text card on the canvas. You can choose different background colors for the card directly from the keyboard_arrow_down menu.
# 2. "Pointer Function" Section
This defines how your mouse interacts with the canvas. Only one mode can be active at a time:
- arrows_output Selection Mode: Click, move, or resize objects.
- radio_button_checked Laser Pointer: Activates a red dot that other participants can follow in real-time.
- stylus_note Pen: Enables freehand drawing. The color may be selected via keyboard_arrow_down. The line thickness can be adjusted via the adjacent button pen_size_3 / pen_size_4 / pen_size_5 .
Workflow Tip
Remember to switch back to Selection Mode (or press the Esc key) after drawing to be able to grab, move, or resize objects again.
# 3. "View" Section
Control the layout of your workspace:
- fit_page Fit to Screen: The entire tool is scaled down to fit the window without scrolling (best for overviews).
- fit_width Maximize Width: The tool uses the full available width. For portrait content (e.g., PDF presentations), scrolling may be required.
- Toggle Chat: Show or hide the chat area on the right to gain more space for graphical work.
# 4. "Copy" Section
Allows you to content_copy copy and content_paste paste objects—even across different tools.
# Interaction on the Canvas
Once objects are placed, you have intuitive ways to manipulate them:
- Selecting: A single click selects an object. Four blue circles (handles) appear for resizing.
- Rotating: A rotation point extends from the top of the object. Click and hold it to rotate the object to any angle.
- Moving: Selected objects can be positioned anywhere via drag-and-drop.
# The Context Menu
When you click on an object, a specific toolbar appears directly next to it. This allows you to edit text, change shapes, or adjust the layering (Bring to Front / Send to Back).
- edit Edit Text Field
- rectangle Rectangle, vignette Ellipse, cloud Cloud as shape of the text field
- sticky_note Change text field fill color
- content_copy Copy and content_paste Paste
- flip_to_front Bring to Front or flip_to_back Send to Back
- delete_forever Delete
# chat Communication in Chat
The integrated chat offers the full functionality of the standalone chat tools. You can format text, exchange files, and record important milestones without leaving the graphical view.
More on Chat
Detailed information on chat functionality can be found in the article about the Chat Tool.